After a while, everything wears out, 3d printer components included. I noticed, not too long ago, that my bowden tube kept slipping out of the pneumatic fitting attached to the extruder. Whenever the extruder would feed filament it would push the tube out too.

Upon investigation, I found that there are little “teeth” inside of the pneumatic fitting the keep the tube in place. Pushing down the little plastic ring disengages the teeth and allows the tube to slip out. Over time, the teeth had worn out and needed to be replaced. On most extruders, this is a simple fix. Just find the right size pneumatic fitting and replace it.

Sometimes you just have to lay down a lot of filament. I make large structures for my boys, where details aren’t really that important and it’s ok if you can see layer lines in the print. When I print these, I like to switch from the 0.4mm nozzle to a 0.6mm nozzle to accommodate more filament being put down. However, there are a couple of adjustments that need to be made.

  • Slow down the speed a little bit. The bigger cross-section of the extruded filament takes a little longer to heat up. Slow down to give it time to heat. Even with a slightly slower move speed, you are still putting down 1.5 times as much filament so your net speed is still much higher.
  • Increase the temperature at the nozzle. You have increased the nozzle diameter by 1.5x. The center is going to cool down a little bit faster than with a 0.4mm nozzle.

When designing parts for 3d printing, make sure they will fit together. Sounds like common sense, but I hear of a lot of people trying to fit a 1/2″ pin inside a 1/2″ hole. Unless your intent is to get an interference fit, it won’t work.

From a design perspective, you need a small clearance fit for components to fit together. You can either make the hole larger or the pin smaller.

From a manufacturing perspective, your perfectly round pin that is exactly 1/2″ on your computer isn’t exactly round or exactly 1/2″. Depending on a lot of variables, it’s going to be slightly oversize or slightly undersize. How much will really depend on the process that you choose, the materials that you use, the environment that it’s in, the condition of the machine, etc. In addition to extra functionality like extra print heads, closer tolerance control is probably the biggest reason why a $10,000 3d printer costs so much compared to the little hobby printer that I have at home.

There are a couple of things that you can do to improve your tolerance. Maintain your equipment, get better equipment, level your bed, maintain your environment, buy good quality filament, etc. You should also run a tolerance test. You print a couple of parts that have gaps in the cad of varying sizes. If your 0.020″ gap is fused together, then that is your limit. It’s good to know your limit.

Symptoms of a poor bed level include:

  • print not sticking to the bed
  • nozzle scraping bed
  • thin or see-through first layer

When I get this, there are a couple of things that I check. First I check the printer mechanically:

  • Disable any BLTouch probing
  • Level the bed using a paper or feeler gage
  • Create mesh bed level manually
  • If troubleshooting, run a test print.
  • Enable BLTouch probing
  • Create automatic bed level
  • Run test print

From following these steps, you should be able to accurately diagnose where the problem with your bed level lies. Address accordingly.

This tip is so specific that I’m surprised that it has come up as frequently as it has. For context, many people use Klipper on a Raspberry Pi to manage their 3d printer. There are two main interfaces for Klipper, Mainsail and Fluidd. This tip is for those who are set up with Mainsail.

When moving your 3d printer to a new wifi network, there are two things that I do. With the Raspberry Pi powered off, remove the SD card and put it into your laptop or desktop computer. Ensure that you don’t use Notepad or Wordpad to edit the file, as they tend to bring in characters that mess up files. Use something like Notepad++ instead. In the root directory of the SD card you will find a file called mainsailos-wpa-supplicant.txt. Open that file in your text editor and change your network information. Most common nowadays is WPA/WPA2.

The other optional step that I do is to log into the router and set up my Raspberry Pi as a static ip address instead of letting DNS manage it. Each router is different, so I won’t go into detail on how to do that here. Most routers have something like “Advanced networking.”

Someone recently showed a picture of their 3d printed 25mm calibration cube. Unfortunately for them, however, it was not a cube at all. It was a 25mm x 12.5mm x 20mm shape. 

When digging into the problem a little bit, it turns out that they had changed some stepper motors and firmware and accepted all of the default values. If the firmware has not been specifically written for your printer, the default values are most likely wrong. Same thing for the stepper motors. If you replace stepper motors, make sure that your X, Y, and Z steps are correct. Using Marlin based firmware, you can set your X, Y, Z and E steps in the firmware before flashing or you can use the M92 command to update. Using Klipper firmware, you must set your rotation distance.

Right out of the box, Cura is pretty powerful. But, sometimes you still just need a little extra functionality. Fortunately, Cura makes this pretty easy to implement. Here is how I do it. Once I figure out which plugin I want to use, I add my login information into Cura. This synchronizes the software on my laptop to my account on the cloud. Then I go to the Ultimaker Marketplace on the web and find the plugin directory. You can add plugins from Cura itself, but I have found it to be very laggy and difficult to use so I just do it from the web. Pick the plugin(s) that you want and add them to your account. Restart Cura and it will ask you to synchronize your account.  

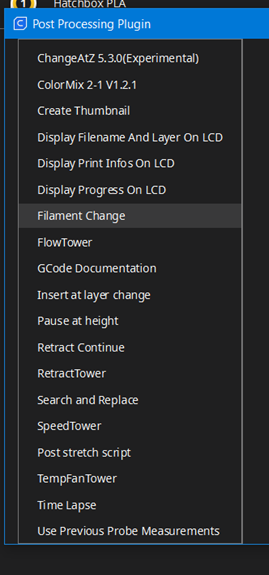
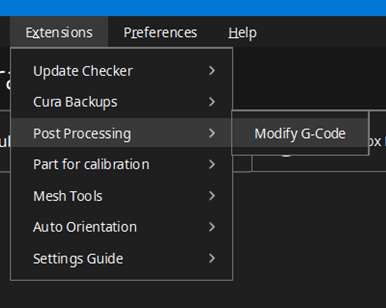
Sometimes, you run out of filament in the middle of your print and need to change it. Other times, you intentionally want to change your filament. For example, you might want to start a print with gold and finish with black. This post is about how I do that. If you already have the plugin setup, go to Extensions, Post Processing, Modify G-Code. Press “Add Script” (the only option available) then select Filament Change. You will need to figure out what height you want the change to occur at, and then convert that into layers. At a 0.2mm layer height, 10mm would be layer 20, for example. From there, just slice your model as normal and Cura will include the command to change filament.

Changing your printer Nozzle

Sometimes you need to change your nozzle. I do this most frequently when I change filament materials or when I need more details. I made a jewelry box for my wife last year and I used a wood PLA filament. Most hobby printers (including mine) use a default 0.4mm nozzle tip. The wood clogged my tip, so I switched it out to a larger tip. Other times, I want to print figurines for my kids with a lot of details so I want to switch to a smaller tip.

Here is what I do:

  • Heat up the extruder. I’ve found that the hot end material contracts around the nozzle tip. Heating it up expands the hot end and makes the nozzle easier to remove.
  • Remove the old tip
  • Insert the new tip
  • Adjust the nozzle size and line width in Cura (or other preferred slicer)
  • Calibrate e-steps to compensate for new flow rate
  • PID tune to adjust heating properties
  • Level bed