Every once in a while, I am asked by someone about what their acceleration should be set at. My answer, as in so many cases, is “it varies.”

If you go too low, you won’t necessarily hurt anything, but your prints will take forever. If you set acceleration too high your belts will jerk abruptly each time the axis changes direction and you risk skipping teeth on the belts and getting layer shift.

I’ve run tuning test towers, and I know that my printer starts to have problems around 2,500 or 3,000 mm/s². It skips teeth and my layers end up all over the place.

Unless you want to do a tuning tower for each print (not practical) you are better off doing a little educated guessing based on what you are printing. 

For small, intricate, parts I set my acceleration low. Somewhere around 500 mm/s². For larger parts that don’t have a lot of detail, I might set at 2,000 or 2,500.

Maybe this is an unpopular opinion, but I don’t think it matters a whole lot for small parts. When you do a 3-point turn in your car, your acceleration doesn’t matter much. You are changing direction too frequently for it to even matter. I don’t have scientific data to back this up, but I would guess that it takes a Ferrari about the same amount of time to do a 3-point turn as my Dodge Dakota. If someone has a Ferrari they want to let me borrow to do that test, I’m game. The same is true on your 3d printer when you print small parts, so your acceleration doesn’t matter a whole lot.

For Christmas, I’m making the famous leg lamp from “A Christmas Story” for one of my family members. He’s always been a big fan of the movie and the leg lamp has become a running gag between us. 

However, making the lamp does pose a few unique problems. One issue is that I will need to run an electrical wire through the leg itself to provide power to the led light that I will put in it. I figure I have two options, I can either put a hole through the leg in the cad and then print it that way, or I can change the print settings. What I’m trying first is to create the leg with 0% infill, but I’m increasing the number of exterior walls to compensate. Hopefully this provides a leg that is still structurally sound, but allows me to put the wire through the inside of the leg.

Someone recently wondered why they were losing details on their prints that they were making with their FDM printer. To be fair, the best way to get really good details in 3d prints is to use a resin printer. They are just better at it. However, if your situation dictates that you use a FDM printer, there are a couple of things that you can do to get a little more detail from your prints. 

First of all, reduce the layer height. Many slicers have a default layer height of 0.2mm. This means that you will definitely be able to see the layer lines and lose a significant amount of detail. Each machine is different, I’ve found the best setting for mine to be 0.08mm, but you should experiment with different settings to see what yours is. Most FDM printers are more accurate in X and Y than they are in Z, so this will resolve a lot of your problems.

Another fix that you can try is to reorient the print. Lithopanes, for example, are usually printed vertically. Even though the structure is more stable laying flat, it’s difficult to obtain the detail needed for a lithopane in that orientation.

Sometimes you just need something to put up on your mantle. It has no functional value to you or your family, It’s just for looks. In this case, you can enable “Vase Mode” in Cura. The official setting in Cura is “Spiralize Outer Contour” under the “Special Modes” settings group. This setting gives you no infill and only a single pass wall thickness. It’s not very strong, it really is something that is just for looks.

Right out of the box, Cura is pretty powerful. But, sometimes you still just need a little extra functionality. Fortunately, Cura makes this pretty easy to implement. Here is how I do it. Once I figure out which plugin I want to use, I add my login information into Cura. This synchronizes the software on my laptop to my account on the cloud. Then I go to the Ultimaker Marketplace on the web and find the plugin directory. You can add plugins from Cura itself, but I have found it to be very laggy and difficult to use so I just do it from the web. Pick the plugin(s) that you want and add them to your account. Restart Cura and it will ask you to synchronize your account.  

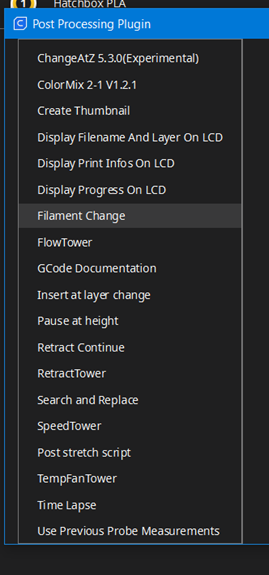
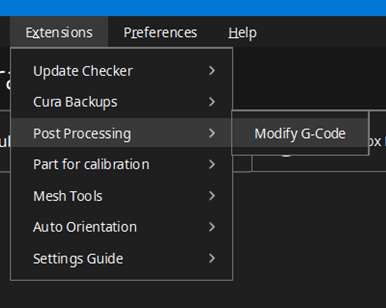
Sometimes, you run out of filament in the middle of your print and need to change it. Other times, you intentionally want to change your filament. For example, you might want to start a print with gold and finish with black. This post is about how I do that. If you already have the plugin setup, go to Extensions, Post Processing, Modify G-Code. Press “Add Script” (the only option available) then select Filament Change. You will need to figure out what height you want the change to occur at, and then convert that into layers. At a 0.2mm layer height, 10mm would be layer 20, for example. From there, just slice your model as normal and Cura will include the command to change filament.

3d printing, inventing, experimenting, they all go together. One of the unfortunate side effects of experimentation is that I sometimes get myself in trouble. I checked a couple of boxes in Cura, just to see what they did. Then I forgot about it. This made for an interesting couple of days while I tried to figure out why all of my holes disappeared when I sliced my model. Upon further research, it turns out that this setting does have a good purpose. Sometimes, designers will introduce internal cavities into a model to suit a particular manufacturing process. These don’t work well when 3d printing, so rather than forcing designers to remove all of the internal cavities Cura just included this button for them.