Supports are tricky. You must create a fine balance. Too much support and your supports are difficult to remove and leave ugly marks. Too little support and everything falls apart. Today, I wanted to go over a few things that I consider when setting a print up that needs supports.

First, you need to decide whether you need supports or not. Cura has a handy feature that shows you the areas of your model that need supports in red. To enable this feature, go to the Preview tab and click on the eye icon on the top right corner. Then, select Show Overhangs from the drop-down menu. You will see the overhangs highlighted in red on your model.

If you see a lot of red areas, you might want to enable supports. To do this, go to the Prepare tab and click on the Support icon on the left sidebar. You will see several options for supports, such as Support Placement, Support Overhang Angle, Support Density, and more. Here are some tips for choosing the right settings:

  • Support Placement: This option lets you choose where to place the supports. You can choose Everywhere, which means the supports will touch both the build plate and the model, or Touching Build Plate, which means the supports will only touch the build plate and not the model.
  • Support Overhang Angle: This option lets you choose the minimum angle for an overhang to be supported. The default value is 50 degrees, which means any overhang that is less than 50 degrees from horizontal will be supported. You can increase or decrease this value depending on your model and your printer’s capabilities. A lower value will create more supports, which can improve print quality but also increase print time and material usage. A higher value will create fewer supports, which can save time and material but also risk print failure or poor quality.
  • Support Density: This option lets you choose how dense the supports are. The default value is 15%, which means 15% of the support area will be filled with material. You can increase or decrease this value depending on your model and your preferences. A higher value will create stronger and sturdier supports, which can help with complex or heavy models, but also increase print time and material usage. A lower value will create weaker and sparser supports, which can save time and material but also risk breaking or collapsing during printing or removal.
  • Support Interface: This option lets you choose whether to add an extra layer between the supports and the model. This layer can improve print quality by reducing marks or scars on the model surface caused by the supports. To enable this option, check the Generate Support Interface box. You will see two sub-options: Support Roof and Support Floor. The roof is the layer that touches the model from above, and the floor is the layer that touches the model from below. You can adjust the thickness and density of these layers according to your needs.

While printing with silk PLA, I had a couple of difficulties. One of the things that I encountered was with retraction. Without retraction enabled, my prints were a stringy mess. However, with retraction enabled, my extruder would grind a flat spot onto my silk PLA.

My lifesaver, it turns out, was two settings inside of Cura.

The way that Cura applies these two settings can be translated as “do not retract more than two times until at least 10mm of filament has been extruded.”

Adjusting these settings proved to be very helpful and allowed me to finish the prints that I had been having trouble with.

My daughter recently asked me to print something for her in two entirely different types of filaments. To do so would require me to change almost all of the settings partway through the printing process. Here is how I did it with the post processing script plugin for Cura. This plugin allows you to add custom g-code commands at specific layers or heights of your print, which can override the default settings of your slicer.

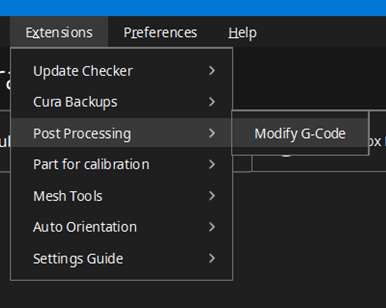
To use the post processing script plugin, you need to have Cura installed on your computer. You can download it from https://ultimaker.com/software/ultimaker-cura. Once you have Cura open, load your model and slice it as usual. Then, go to the Extensions menu and select Post Processing > Modify G-Code. This will open a new window where you can add, edit, or delete scripts.

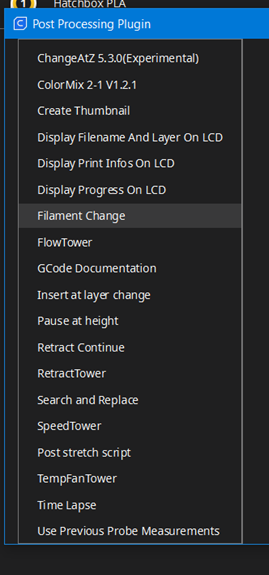
To add a new script, click on the Add a script button and choose one from the list. There are many scripts available, such as ChangeAtZ, PauseAtHeight, FilamentChange, etc. For this example, I will use the ChangeAtZ script, which lets you change any parameter at a given layer or height. After selecting the script, you will see a list of options that you can modify. For example, you can choose whether to trigger the script by layer or by height, what parameter to change, and what value to set it to. You can also add a comment to remind yourself what the script does.

For example, let’s say I want to change the temperature from 200°C to 220°C at layer 50 of my print. I would select the ChangeAtZ script and set the following options:

  • Trigger: Layer No.
  • Layer No.: 50
  • Behavior: Keep value
  • Change extruder 1 temp: True
  • Extruder 1 temp: 220
  • Comment: Increase temperature

This will insert a custom g-code command at layer 50 that will set the temperature of extruder 1 to 220°C and keep it until the end of the print. You can add multiple scripts if you want to change more than one parameter or change them multiple times during the print. You can also edit or delete scripts by clicking on the pencil or trash icons next to them.

Once you are done with adding scripts, click on Close and save your g-code file as usual. Then, transfer it to your printer and start printing. You should see your parameter changes take effect at the specified layers or heights of your print.

The post processing script plugin for Cura is a powerful tool that can help you fine-tune your prints and achieve better results. You can use it to experiment with different settings and see how they affect your print quality, speed, or appearance. You can also use it to create some interesting effects, such as changing colors, pausing for inserts, or adding text or logos. The possibilities are endless!

Sometimes, in Cura, you may encounter gaps in your prints that affect the quality and appearance of your parts. I want to explain how to fill in any gaps in Cura using some simple settings and tips. I’m assuming a properly calibrated 3d printer. If you haven’t done that, do that first.

Gaps can occur in different parts of your prints, such as the top and bottom layers, the walls, or the infill. There are different reasons for these gaps, such as under-extrusion, incorrect nozzle size, low flow rate, or wrong layer height. To fix these gaps, you need to adjust some settings in Cura that affect the amount and distribution of material in your prints.

One of the most important settings to check is the line width, which determines how wide each extruded line is. The line width should match your nozzle size or be slightly larger (up to 120% of the nozzle size). If the line width is too small, there will be gaps between the lines. You can find the line width settings under the Quality category in Cura.

Another setting that affects the gaps is the flow rate, which controls how much material is extruded by the printer. The flow rate should be 100% by default, but you can increase it slightly (up to 110%) if you notice under-extrusion or gaps in your prints. However, be careful not to over-extrude, as this can cause other problems such as blobs or stringing. You can find the flow rate setting under the Material category in Cura.

A third setting that can help you fill in the gaps is the top/bottom pattern, which determines how the top and bottom layers are printed. The top/bottom pattern can be either lines, concentric, zigzag, or triangles. The lines pattern is the fastest and most common option, but it can leave gaps between the lines if they are not aligned properly. The concentric pattern can create a smoother surface, but it can also create gaps if the nozzle moves too far from the center. The zigzag pattern can fill in the gaps better than the lines or concentric patterns, but it can also create more travel moves and stringing. The triangles pattern can create a strong and uniform surface, but it can also increase the print time and material usage. You can find the top/bottom pattern setting under the Shell category in Cura.

Sometimes you just need something to put up on your mantle. It has no functional value to you or your family, It’s just for looks. In this case, you can enable “Vase Mode” in Cura. The official setting in Cura is “Spiralize Outer Contour” under the “Special Modes” settings group. This setting gives you no infill and only a single pass wall thickness. It’s not very strong, it really is something that is just for looks.

Right out of the box, Cura is pretty powerful. But, sometimes you still just need a little extra functionality. Fortunately, Cura makes this pretty easy to implement. Here is how I do it. Once I figure out which plugin I want to use, I add my login information into Cura. This synchronizes the software on my laptop to my account on the cloud. Then I go to the Ultimaker Marketplace on the web and find the plugin directory. You can add plugins from Cura itself, but I have found it to be very laggy and difficult to use so I just do it from the web. Pick the plugin(s) that you want and add them to your account. Restart Cura and it will ask you to synchronize your account.  

Sometimes, you run out of filament in the middle of your print and need to change it. Other times, you intentionally want to change your filament. For example, you might want to start a print with gold and finish with black. This post is about how I do that. If you already have the plugin setup, go to Extensions, Post Processing, Modify G-Code. Press “Add Script” (the only option available) then select Filament Change. You will need to figure out what height you want the change to occur at, and then convert that into layers. At a 0.2mm layer height, 10mm would be layer 20, for example. From there, just slice your model as normal and Cura will include the command to change filament.

3d printing, inventing, experimenting, they all go together. One of the unfortunate side effects of experimentation is that I sometimes get myself in trouble. I checked a couple of boxes in Cura, just to see what they did. Then I forgot about it. This made for an interesting couple of days while I tried to figure out why all of my holes disappeared when I sliced my model. Upon further research, it turns out that this setting does have a good purpose. Sometimes, designers will introduce internal cavities into a model to suit a particular manufacturing process. These don’t work well when 3d printing, so rather than forcing designers to remove all of the internal cavities Cura just included this button for them.