Orca Slicer is an open source slicer for FDM printers that is based on Bambu Studio, which is a fork of PrusaSlicer. Orca Slicer offers some unique features and advantages over other slicers, such as Cura and PrusaSlicer.

Orca Slicer Pros:

  • It has a sandwich mode, which prints the inner and outer perimeters alternately, resulting in smoother and stronger walls.
  • It has a precise wall feature, which adjusts the extrusion width to match the model’s wall thickness, avoiding gaps or overlaps.
  • It supports Klipper firmware and has a built-in auto calibration feature for all printers.
  • It has more granular controls over print settings, such as overhang slowdown, adaptive bed mesh, first layer print sequence, etc.
  • It has a stealth mode, which disables connections to BBL HMS (Bambu’s cloud service) for privacy and security reasons.

Orca Slicer Cons:

  • It is still in development and may have some bugs or stability issues.
  • It does not have as many printer profiles or plugins as Cura or PrusaSlicer.
  • It does not have a built-in model repair or analysis tool like Cura or PrusaSlicer.

Cura Pros:

  • It is widely used and supported by many printer manufacturers and communities.
  • It has a large library of plugins and extensions that add extra functionality and customization options.
  • It has a powerful model repair and analysis tool that can fix common errors and optimize print quality.

Cura Cons:

  • It can be slow and resource-intensive, especially when slicing complex models or using many plugins.
  • It can be overwhelming and confusing for beginners, as it has hundreds of settings and parameters to tweak.
  • It does not support Klipper firmware or sandwich mode.

PrusaSlicer Pros:

  • It is developed by Prusa Research, one of the leading 3D printer companies in the world.
  • It has a sleek and intuitive user interface that is easy to use and navigate.
  • It has a built-in model repair and analysis tool that can fix common errors and optimize print quality.

PrusaSlicer Cons:

  • It is mainly designed for Prusa printers and may not work well with other printers or firmware.
  • It does not have as many plugins or extensions as Cura or Orca Slicer.
  • It does not support Klipper firmware or sandwich mode.

Conclusion:

Orca Slicer is a promising slicer that offers some unique features and advantages over other slicers, such as Cura and PrusaSlicer. However, it is still in development and may not be as stable or compatible as the other slicers. Cura and PrusaSlicer are more established and widely used slicers that have more printer profiles, plugins, and tools. However, they also have some drawbacks, such as performance issues, complexity, or compatibility issues. Ultimately, the best slicer for you depends on your preferences, needs, and printer. You can try out different slicers and see which one works best for you.

Working with flexible filament, such as TPU, is challenging.

One of the main challenges of working with TPU filament is its high elasticity and low rigidity. This means that TPU filament can stretch and bend easily, which can cause problems with extrusion, retraction, and feeding. It can be similar to trying to push rope. It is advisable to reduce the retraction distance and speed, as well as the print speed, to prevent stringing and oozing.

Another challenge of working with TPU filament is its sensitivity to temperature and humidity. TPU filament can absorb moisture from the air, which can affect its print quality and performance. Moisture can cause bubbles, cracks, and warping in the printed objects, as well as increase the risk of nozzle clogging. To prevent these problems, it is essential to store TPU filament in a dry and cool place, preferably in a sealed bag with desiccants. Moreover, it is recommended to use a heated bed and an enclosed print chamber to maintain a stable temperature and avoid drafts.

A third challenge of working with TPU filament is its adhesion to the print surface. TPU filament can stick very well to some surfaces, such as glass or PEI, but not so well to others, such as blue tape or BuildTak. This can result in either poor bed adhesion or difficulty in removing the printed objects. To solve this dilemma, it is helpful to use a thin layer of glue stick or hairspray on the print surface to improve the adhesion. Alternatively, it is possible to use a flexible or magnetic build plate that can be easily detached and bent to release the printed objects.

One final challenge that I’ve experienced is that some TPU (or filaments with TPU in them) tend to expand when heated up. I normally like to warm up my machine for a few minutes before beginning a print. This allows for any expansion and movement to happen while the machine is sitting idle, rather than while the machine is printing. However, I’ve found that some TPU based filaments will burn and end up leaving burnt pieces in the nozzle, which end up clogging it. For TPU based filaments, I prefer to retract the filament approximately 100mm, then warm up the nozzle, and include a line of code in the beginning of my file that feeds the filament back into the nozzle. For this same reason, I also like to do a cold pull after each part that I print with TPU based filament. I just cut off the last 25mm or so of the filament. I have far fewer issues that way.

These are some of the challenges of working with TPU filament that I have encountered and how I have overcome them. I hope this information was useful for you. If you have any questions or comments, please feel free to leave them below. Happy printing!

If you ever go online to 3d printing chat rooms or help forums, you will inevitably have seen someone describe a problem with their 3d print to which someone will reply “your nozzle is too close to the bed.” What does this mean and what should you do about it?

When the nozzle of a 3D printer is too close to the bed, it can cause several issues.

  • The nozzle can scrape against the bed.
  • The nozzle can drag against the extruded filament and end up dislodging your part.
  • The nozzle can drag against the top of the layer and create a very rough first layer.

If you notice any of these issues with your printer or with your print you have a few options.

  • You can adjust the Z-axis offset
  • Relevel your bed
  • Lower your bed (also requires releveling)

If you are using silk PLA, you might have encountered a common problem: the extruder gear grinds a flat spot on your filament when you have retraction enabled. This can cause under-extrusion, clogging, and poor print quality. But if you disable retraction, you might get stringing and oozing. So how can you overcome this dilemma? Here are some tips that might help you.

  • Increase the extruder temperature. Silk PLA usually requires a higher temperature than regular PLA, around 210-230°C. This will reduce the resistance in the hot end and allow the filament to flow more easily.
  • I have also had success with reducing the extruder temperature to the very minimum temperature. When reducing the temperature the flow of PLA is slower, so a slower speed is also required to accommodate the lower temperature. This option allows me to disable retraction altogether.
  • Decrease the retraction distance and speed. Retraction pulls the filament back into the extruder to prevent oozing, but it also puts more stress on the filament. Try reducing the retraction distance to 2-3 mm and the speed to 20-30 mm/s. This will minimize the grinding and still prevent stringing.
  • Calibrate the extruder tension. The extruder tension is the force that the extruder gear applies on the filament to push it through the nozzle. If the tension is too high, it can cause grinding and flattening of the filament. If it is too low, it can cause slipping and under-extrusion. You can adjust the tension by turning a screw or a knob on your extruder. The ideal tension is when you can pull the filament out of the extruder with moderate force, but not too easily or too hard.
  • Use a high-quality filament. Silk PLA is a special type of PLA that has a shiny and smooth surface. However, not all silk PLA filaments are created equal. Some might have inconsistent diameter, impurities, or additives that can affect the print quality and performance. Make sure you buy from a reputable brand and store your filament in a dry and cool place.

Your first layer in 3d printing is everything. It’s the layer that ties your print to the bed…or not. If you don’t get your first layer down right then there’s a good chance your print will not be successful. So what should you be looking for in a first layer?

To achieve a perfect first layer, you need to consider three main aspects: bed surface preparation, bed leveling, and calibration.

Bed surface preparation involves cleaning and preparing the bed for maximum adhesion with your chosen filament.

Bed leveling involves adjusting the distance between the nozzle and the bed so that it is consistent across the entire print area. If the nozzle is too close to the bed, it will squish the filament too much and create a rough and thin first layer. If the nozzle is too far from the bed, it will extrude too much filament and create a loose and uneven first layer. You can level your bed manually by using a piece of paper or a feeler gauge as a spacer between the nozzle and the bed, and turning the knobs or screws on each corner of the bed until you feel a slight resistance. Alternatively, you can use an automatic bed leveling sensor or probe that measures the distance between the nozzle and the bed at multiple points and compensates for any irregularities.

Calibration involves fine-tuning your settings such as first layer height, first layer speed, first layer temperature, and first layer line width to optimize your first layer quality. These settings can vary depending on your printer model, filament type, and personal preference, but here are some general guidelines:

  • First layer height: A lower first layer height (such as 50% or 75%) can improve adhesion and smoothness, but it may also increase the risk of clogging or over-extrusion. A higher first layer height (such as 100% or 125%) can reduce print time and material usage, but it may also decrease adhesion and accuracy.
  • First layer speed: A lower first layer speed (such as 25% or 50%) can improve adhesion and accuracy, but it may also increase print time and stringing. A higher first layer speed (such as 75% or 100%) can reduce print time and stringing, but it may also decrease adhesion and quality.
  • First layer temperature: A higher first layer temperature (such as 5°C or 10°C above your normal print temperature) can improve adhesion and flow, but it may also increase warping and oozing. A lower first layer temperature (such as 5°C or 10°C below your normal print temperature) can reduce warping and oozing, but it may also decrease adhesion and flow.
  • First layer line width: A higher first layer line width (such as 120% or 150%) can improve adhesion and coverage, but it may also increase the risk of over-extrusion or elephant foot. A lower first layer line width (such as 80% or 100%) can reduce the risk of over-extrusion or elephant foot, but it may also decrease adhesion and coverage.

Ever heard the term “magic numbers”. What are they and why are they important for getting the best quality prints? I Would like to explain what magic numbers are, how to calculate them for your 3D printer, and how to use them in your slicer settings.

Magic numbers are layer heights that are multiples of the minimum height that your Z-axis can move. For example, if your Z-axis can move in increments of 0.04 mm, then your magic numbers are 0.04 mm, 0.08 mm, 0.12 mm, and so on. By choosing one of these magic numbers as your layer height, you can ensure that your printer moves in full steps or half steps, which are more accurate and consistent than micro steps.

Micro steps are fractions of a full step that are achieved by activating two electromagnets on the stepper motor. However, micro steps are not precise and can vary depending on the current and torque of the motor. This can lead to inaccuracies and inconsistencies in your prints, especially if your layer height does not match the steps of your motor.

To avoid micro stepping, you need to know the magic numbers for your 3D printer. You can find them online for popular models like the Ender 3, or you can calculate them yourself using a simple formula or a calculator. The formula is:

Magic number = (motor step angle / 360) * leadscrew pitch * gear ratio

The motor step angle is usually 1.8 degrees for most 3D printers, but you can check your specifications to be sure. The leadscrew pitch is the distance that the leadscrew moves per rotation, which is usually 8 mm for metric leadscrews or 2 mm for imperial leadscrews. The gear ratio is the ratio between the number of teeth on the pulley and the number of teeth on the motor shaft, which is usually 1:1.

For example, if you have a printer with a 1.8 degree motor step angle, an 8 mm leadscrew pitch, and a 1:1 gear ratio, then your magic number is:

Magic number = (1.8 / 360) * 8 * 1 = 0.04 mm

Once you know your magic number, you can choose a layer height that is a multiple of it in your slicer settings. For example, if your magic number is 0.04 mm, you can choose a layer height of 0.08 mm, 0.12 mm, 0.16 mm, etc. This will ensure that your printer moves in full steps or half steps and produces smoother and more accurate prints.

However, there are some limitations and trade-offs to consider when using magic numbers. First of all, not all layer heights are suitable for all models. Some models may require finer details or sharper angles that can only be achieved with lower layer heights. In this case, you may have to sacrifice some quality for accuracy or vice versa.

Secondly, using magic numbers does not guarantee perfect prints every time. There are many other factors that affect print quality, such as temperature, speed, flow rate, cooling, retraction, etc. You still need to calibrate and optimize these settings for your printer and filament.

3D printing, also known as additive manufacturing, is a process of creating three-dimensional objects from digital models by depositing layers of material on top of each other. 3D printing has been around for decades, but it has gained popularity and accessibility in recent years due to advances in technology, materials, and software.

3D printing is not just a hobby or a novelty. It is a revolutionary field that has the potential to transform many industries and sectors, such as healthcare, education, engineering, art, and more. I want to take a moment and share some of the amazing things that people are doing with 3d printing.

  • Healthcare: 3D printing can be used to create customized medical devices, implants, prosthetics, and even organs. For example, researchers at Wake Forest Institute for Regenerative Medicine have successfully printed human skin, cartilage, bone, and muscle tissue using bioprinters that deposit living cells and biomaterials. These printed tissues can be used for transplantation, drug testing, or wound healing.
  • Education: 3D printing can be used to enhance learning and teaching by providing hands-on and interactive experiences for students and teachers. For example, students can print models of historical artifacts, scientific concepts, or mathematical shapes to explore and understand them better. Teachers can also use 3D printing to create customized and engaging curriculum materials and tools.
  • Engineering: 3D printing can be used to design and prototype new products, machines, and structures faster and cheaper than traditional methods. For example, engineers at NASA have used 3D printing to create rocket engine parts, satellites, and even habitats for Mars. 3D printing can also enable more complex and innovative designs that are not possible with conventional manufacturing techniques.
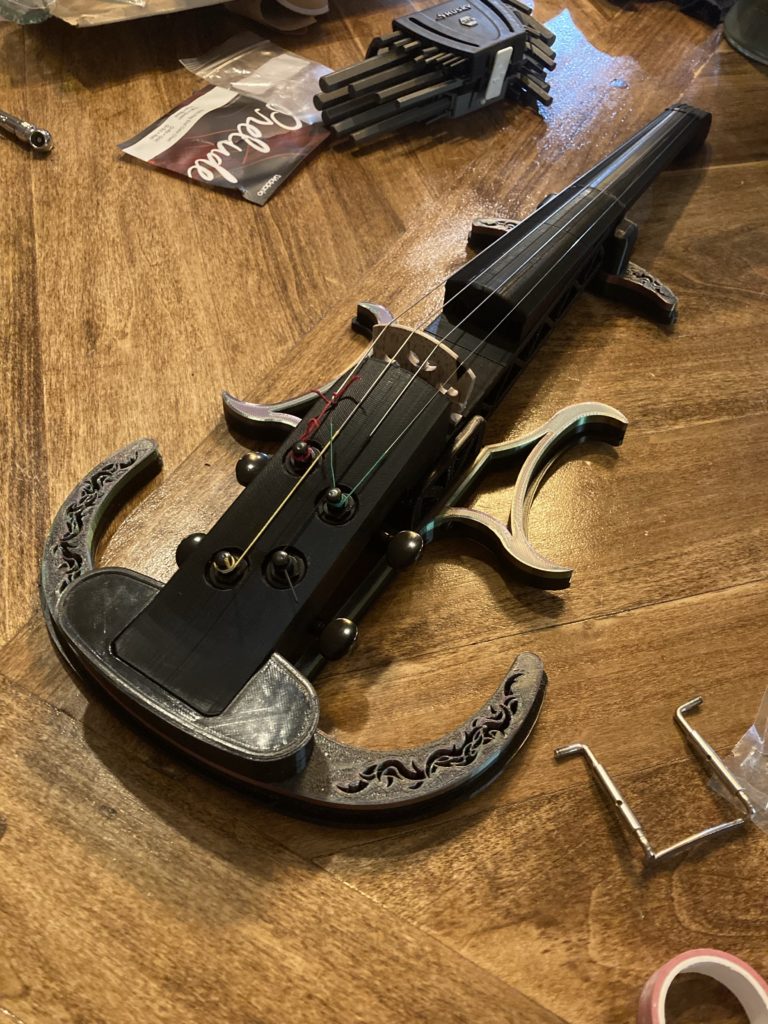
  • Art: 3D printing can be used to create unique and expressive artworks that challenge the boundaries of creativity and aesthetics. For example, artists can use 3D printing to create sculptures, jewelry, fashion, or even musical instruments that combine different materials, colors, textures, and shapes. 3D printing can also allow artists to collaborate and share their work with others online.

These are just some of the examples of how 3D printing is changing the world and I’m humbled to be a part of it. I love that my kids can ask for a DnD character and have it in their hands that very same day. I love that I can tell my boys to design an adapter plate for our fence and they can iterate through the design process quickly.

If you have ever experienced a clogged nozzle or a jammed extruder on your 3D printer, you know how frustrating it can be. One of the possible causes of this problem is burnt filament stuck in the heatbreak, the thin metal tube that connects the hotend and the cold end of the extruder.

The first thing you need to do is to remove the nozzle from the hotend. You can do this by heating up the nozzle to about 200°C and using a wrench to unscrew it.

Next, you need to remove the heatbreak from the cold end. Depending on your extruder design, you may need to unscrew some screws or bolts, or loosen some clamps or springs. You can also mark the orientation of the heatbreak before removing it, so you can reassemble it correctly later.

Now, you have the heatbreak in your hand. You can inspect it and see if there is any burnt filament inside. Burnt filament usually looks dark brown or black, and may have a charred smell. If you see any signs of burnt filament, you need to clear it out.

There are two main methods to clear burnt filament out of a heatbreak: using heat or using mechanical force. Using heat means heating up the heatbreak and melting the burnt filament out. Using mechanical force means pushing or pulling the burnt filament out with a tool.

Using heat is easier and safer, but it may take longer and require more equipment. You can use a heat gun, a soldering iron, a blowtorch, or even your hotend to heat up the heatbreak. You need to heat it up to a temperature higher than the melting point of the filament, but lower than the melting point of the metal. For example, if you are using PLA filament, you can heat it up to about 220°C, but not higher than 660°C, which is the melting point of aluminum.

Once the heatbreak is hot enough, you can use a pair of tweezers or pliers to hold it and gently tap it on a hard surface, such as a metal plate or a ceramic tile. This will cause the melted filament to drip out of the heatbreak. You can also use a thin wire or a needle to poke through the heatbreak and push out any remaining filament. Be careful not to scratch or bend the heatbreak.

Using mechanical force is faster and simpler, but it may be more risky and less effective. You can use a drill bit, a hex key, a screwdriver, or any other tool that fits inside the heatbreak. You need to insert the tool into the heatbreak and twist it or push it until the burnt filament comes out. You can also use a hammer or a vise to apply more force if needed. Be careful not to break or deform the heatbreak.

After clearing out the burnt filament, you need to clean the heatbreak thoroughly. You can use some acetone, alcohol, or water to wipe off any residue or dust. You can also use some compressed air or a vacuum cleaner to blow out any particles. Make sure the heatbreak is dry and shiny before reassembling it.

Finally, you need to reassemble the extruder and reinstall the nozzle.

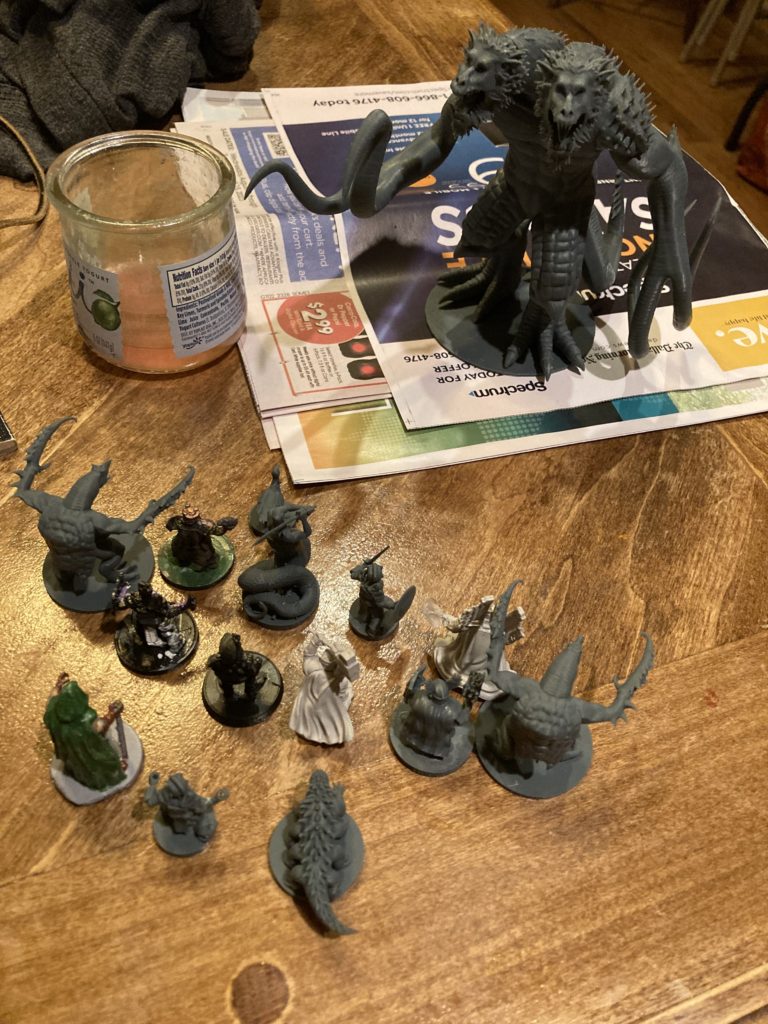
“Dad, I need a demigorgon.”

“A what?” I asked.

“A demigorgon, for my DnD campaign.”

“Ok, let’s find a model for one and we’ll make one.”

After a bit of Googling and searching on designer’s sites, we were able to find an stl file for a demigorgon. By the way, if you need dnd stls, try https://www.shapeways.com/shops/dmworkshop. He has about the most complete collection of files that I was able to find.

This is what I love about 3d printing. When my son needs a demigorgon I can make him one. Now he can have a demigorgon for his dnd campaign instead of having to use a nickel for a placeholder.

The good townfolks below are getting ready to faceoff against the demigorgon, but I’m not sure who will win.